
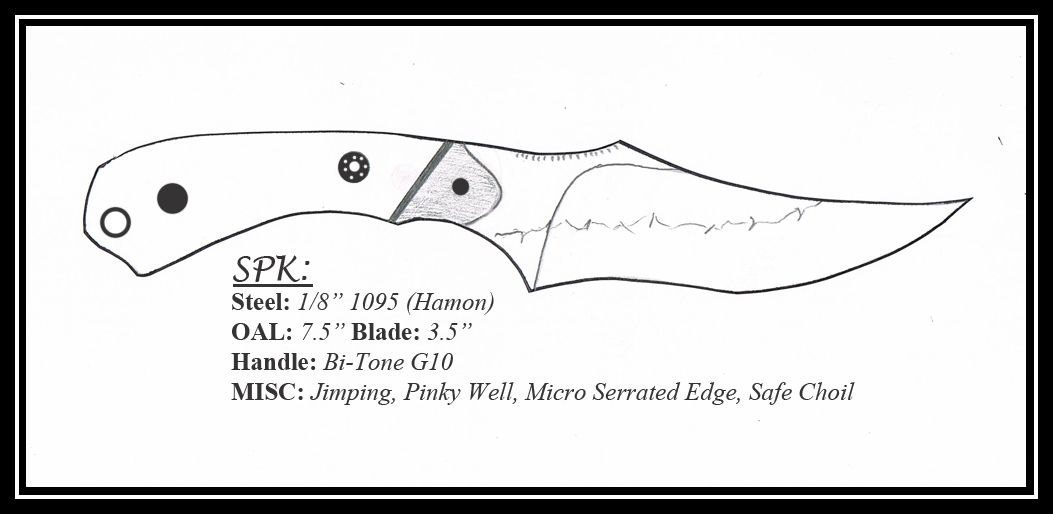
Profiling and Drilling the Blank:
1. 3/16" x 1.5" x 8" Aldo 1095 Bar Stock with design traced on it. Hand punched to stop drill bit from walking.
2. Pilot Drilled all pin holes with 1/8" Bit then the appropriate holes with 1/4" Bit. I then enlarge the holes with #30 & #F bits respectively. I make sure to have my drill press table square to the bit. Then I make sure my Bar stock is even with the top of my ShopFox Vise. This is very important when it comes time to drill the handle scales. I dont want to fight Pins at glue up time.
3. I mark pin holes with an "X" and then drill the weight reducing holes in the tang. This helps me in my brain fart moments to avoid drilling the wrong holes for weight reduction with my Uni-Bit.
4. Then using my mounted Porta-band saw cut the excess material away, I have found that an 18TPI blade tears through steel like butter. Always cut relief cuts where needed to avoid blade pinch and having to back out of a cut.

5. Then to the KMG to clean up the edges, I use an older belt for this. I use the 2" contact wheels on appropriate curves and the Platen on the rest. Again Make sure the Plate is Squared up.
6. I am now ready to mark the center line around the entire blade. I actually mark it a little off center so I have two lines running parallel along the edge.
7. here you see the two lines made by scoring from each side of the blank... Center is in the middle of the two lines. This will help with the Primary grind and when tapering the tang.
8. I like to have visual markers to check sides for even grinds. I trace the blade on cardboard and mark the approximate plunge I want, then cut it out. I then trace it on both sides of the Blade to help with grinding.
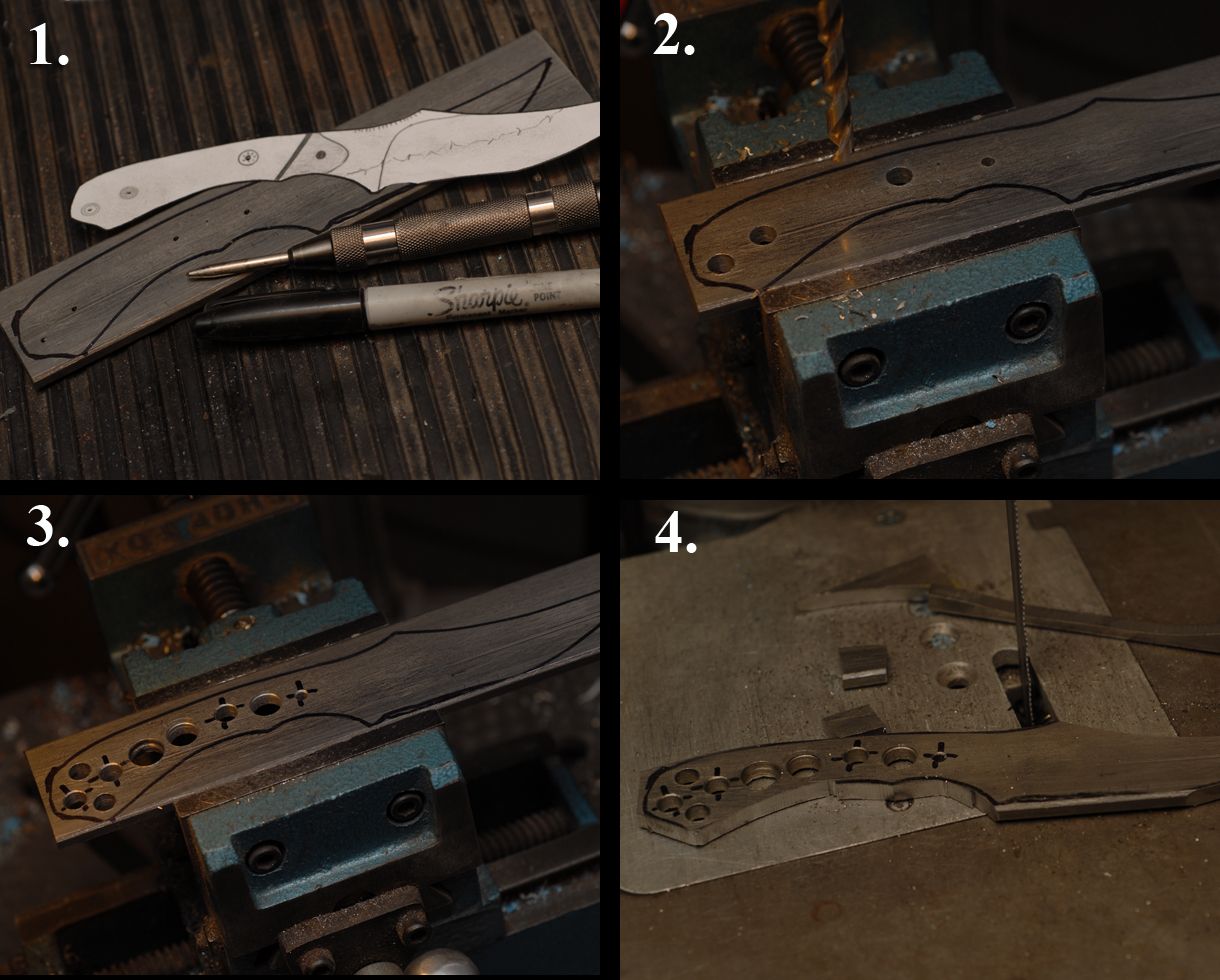
Rough Grind and Tapering the Tang:
9. Rough ground the primary bevel with 50 Grit Norton Blaze belt. I stopped each side at the scribe line (Photo #7) to leave some thickness during HT. Mike Quesnenberry once said the "W" in RyanW must stand for WARP...
 1095 is my kryptonite!
10. After I grind the bevel, the tang is still full thickness. Time for the Tapering of the tang! I feel tapered tangs are neccessary to maintain a good balance in the knife. I use a 30lb. magnet from harbor freight to keep a good grip on the tang and be able to apply pressure starting at the base and slowly work my way up the flat of the Tang. It makes it really easy to watch where you are at by using a Big Ass Sharpie marker over both sides of the tang.
--- Big Ass Sharpie ---
--- Harbor Freight Magnet ----
11. Here you can see what it looks like as you grind up the Tang removing the marker as you grind. I first get the butt where I want it (I stopped at the scribe lines again) then move the grind up and off the top towards the edge.
12. here you see one side tapered and the other not... I then repeat the process and closely inspect to make sure all lines are even on both sides.
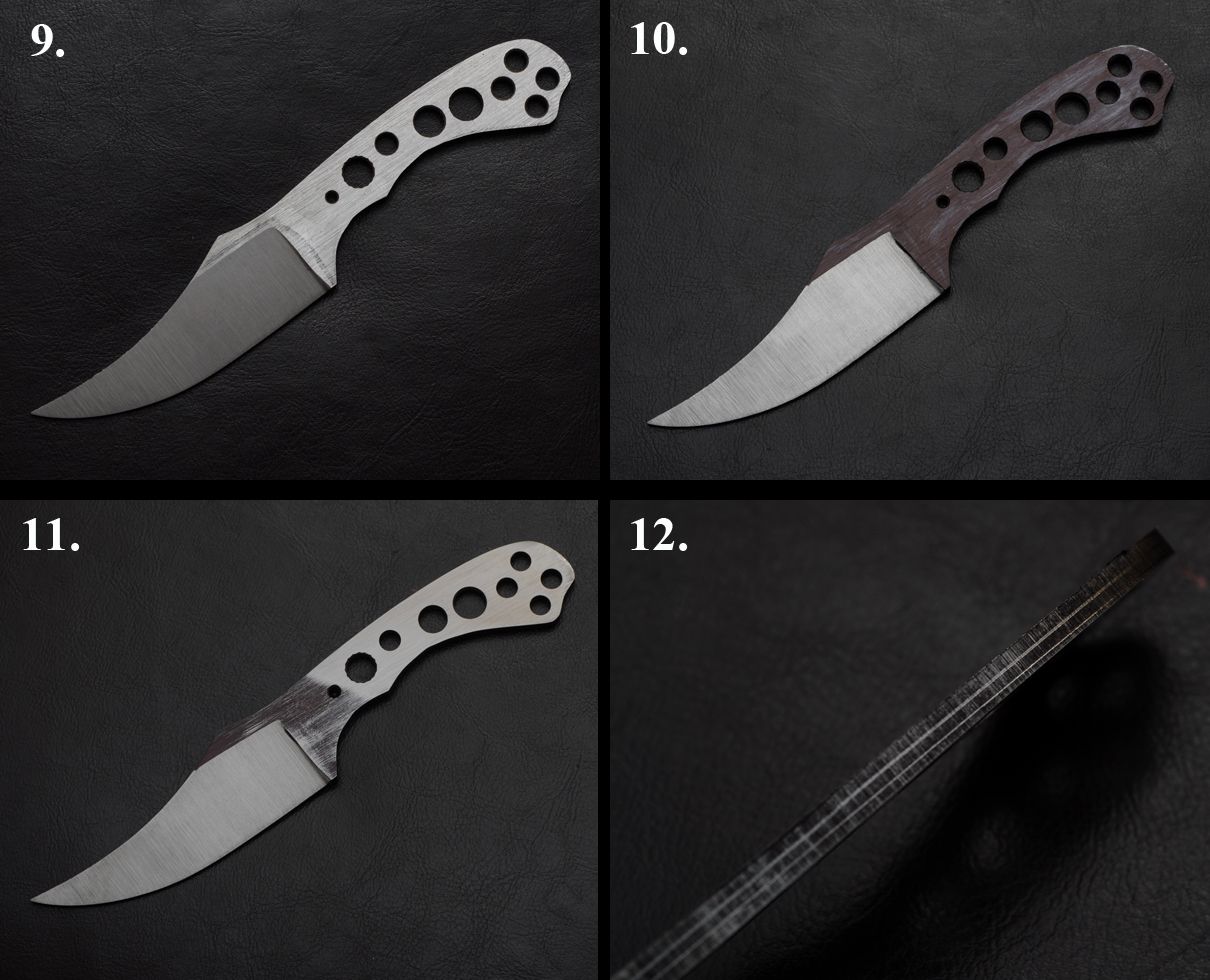
13. Sorry Duplicate photo...
14. This is a different angle showing one side tapered
15. This is a photo of both sides tapered, The left scribe line is hard to see, but it tapers out away from the line at the same rate as the one you can see on the right.
16. Here is the Rough ground and tapered tang ready for the Thumb Jimping... Tonight
Heat Treat and Tempering:
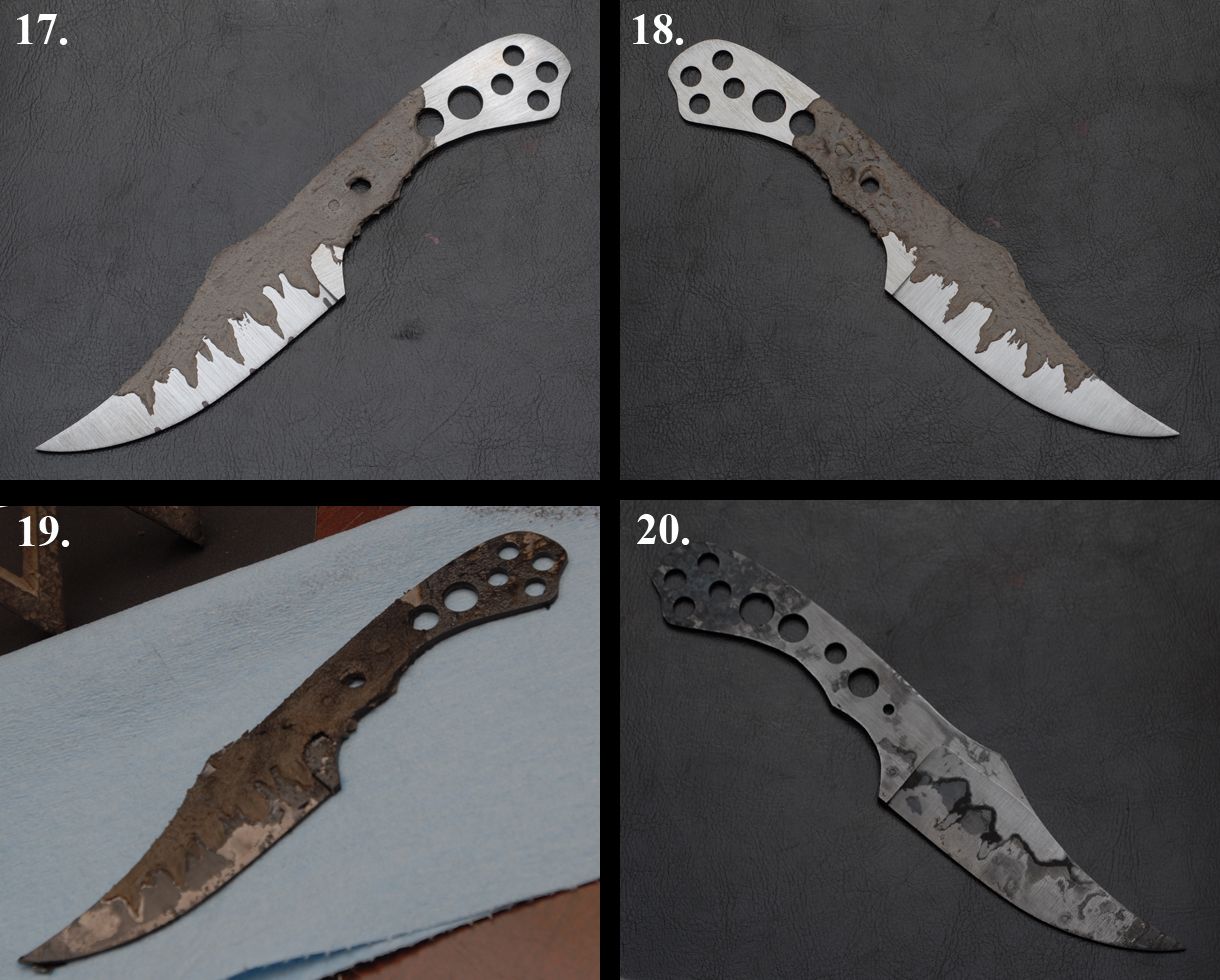
17. Side "A" showing Satanite Clay Coat... You will notice the small marks on the cutting edge. I put the clay on the other side first then mark the back side where the fingers come down. This way I have reference marks as to where to put the fingers.
18. Side "B" of Clay Coat I allow the clay to air dry so I can touch it without problems. Then I put in the oven at 250F for 1hr. to harden a bit more.
INFO: Quench Process
A year ago I switched over from a propane forge to an Evenheat Oven. I have been working very hard to get the process right that came with the change. I have learned a ton and feel like I have what works for me on 1095. It creates a nice Hamon and a great cutting edge.
Oven is set at 1475F (My oven reads a little hotter than it actually is) for 40 Minutes. It takes approximately 25 Minutes to reach temp.
The following times are what show on the Oven "CLOCK"
- 40 Min - I allow the oven to stabilize for 10 minutes
- 30 Min - I place the blade in the oven Cutting edge up, Mike Q. helped me work out an issue I was having with the edge down, thanks MIKE!
- 35 Min - I quickly check with a magnet to see if the blade edge has reached Critical. on smaller knives it usually has become non-magnetic at this point. If it is non-mag. I start my 6-8 minute soak time
- 28 Min - Quickly check for color and flashing motion in the steel (Darkened Room) Close the door
- 26 Min - Quench in Parks 50 and allow to cool to room Temp.
19. This is what it looks like right out of the quenchant. Pretty Damn ugly and Prudy

20. I then scrape off the clay and clean off the oil and looking even better now, I check for Straightness and she is dead Straight!
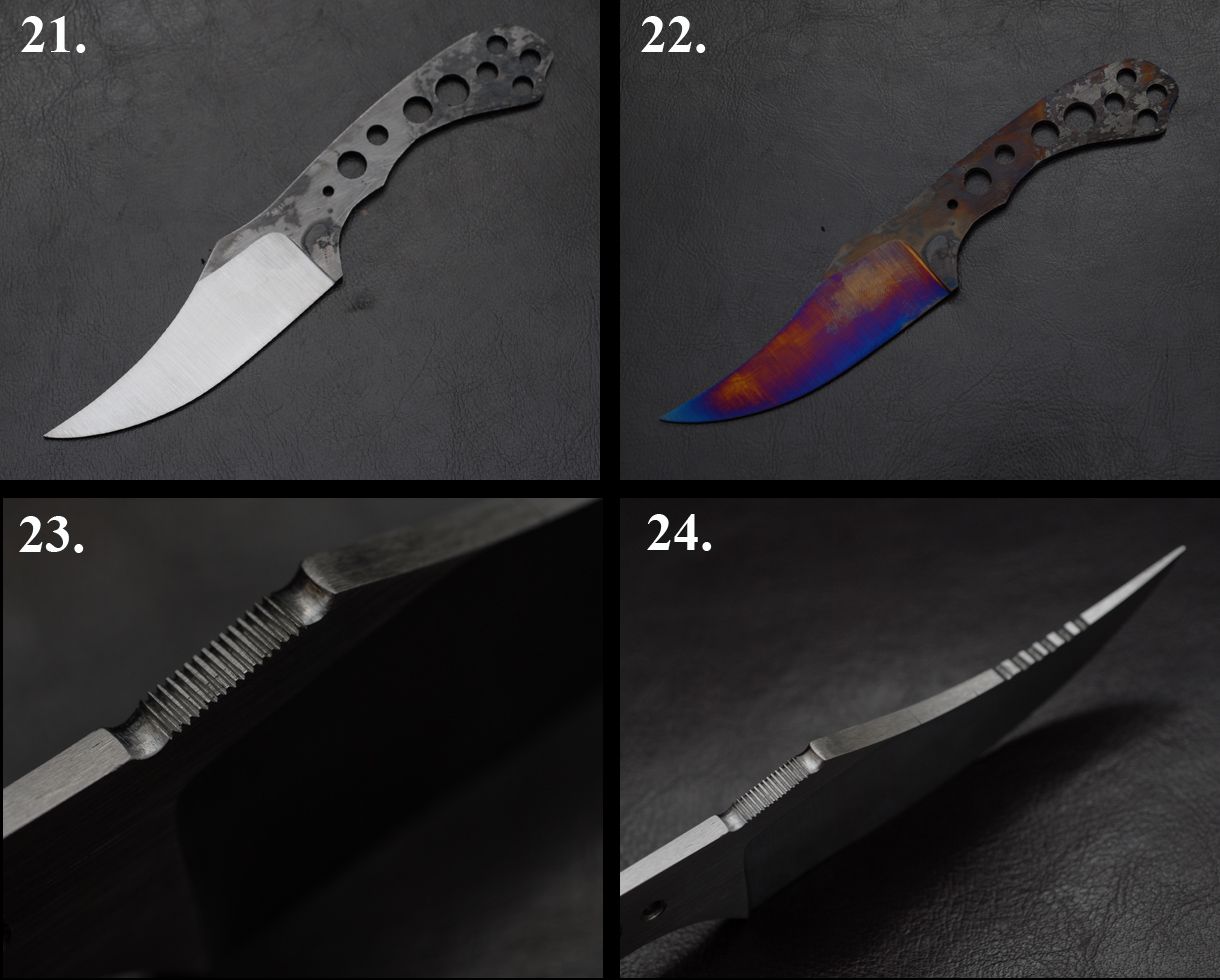
21. To the Grinder 120 Grit Blaze to get a glimpse of that Hamon... moving in the light it is easy to see what you have! We got Lucky...
22. Blade Just out of temper. I make sure to bring the oven up to temp and let stabilize before placing the blade in. My first 1095 temper is at 425F for 1 Hr. let oven cool then Temper again at 450F for an hour and let cool. I usually do this over night to kill time while I sleep. This should put me in the 60 - 61 HRC range. Great for this style of knife. It is a slicer not a chopper. Fresh out of the temper we get all kinds of colors, a lot of this color is caused by oil and stuff on the steel... Dont freak out if you get too much blue in there, I trust my Oven temp and check it frequently.
23. Luckily the spine was still soft enough to do the jimping I forgot to do before HT... I saw BenT do the two large notches around the fine (30TPI) jumping and liked the Idea since this will most likely be covered in Blood. I have a 20 TPI file on order and think it will create functional teeth
24. In my research and viewing some of the different grips used with this knife i decided to put some jimping on the Spine near the tip. UNFORTUNATELY this
was not soft steel so I did an after thought hack job with a Dremel and diamond Bit. Ugly I know but will give the users an idea if they like this feature or not.
Mike (Codger_64) gave me permission to show some of the different grips he sent me to get an idea of the versatility of this design. I will put a few up as they pertain to design features. These would seem to utilize the front Jimping and "Safe Choil", I am not sure if Codger is one that wants the jimping near the tip but I can see how they might help in these grips.
Etching Makers Mark and Hamon:
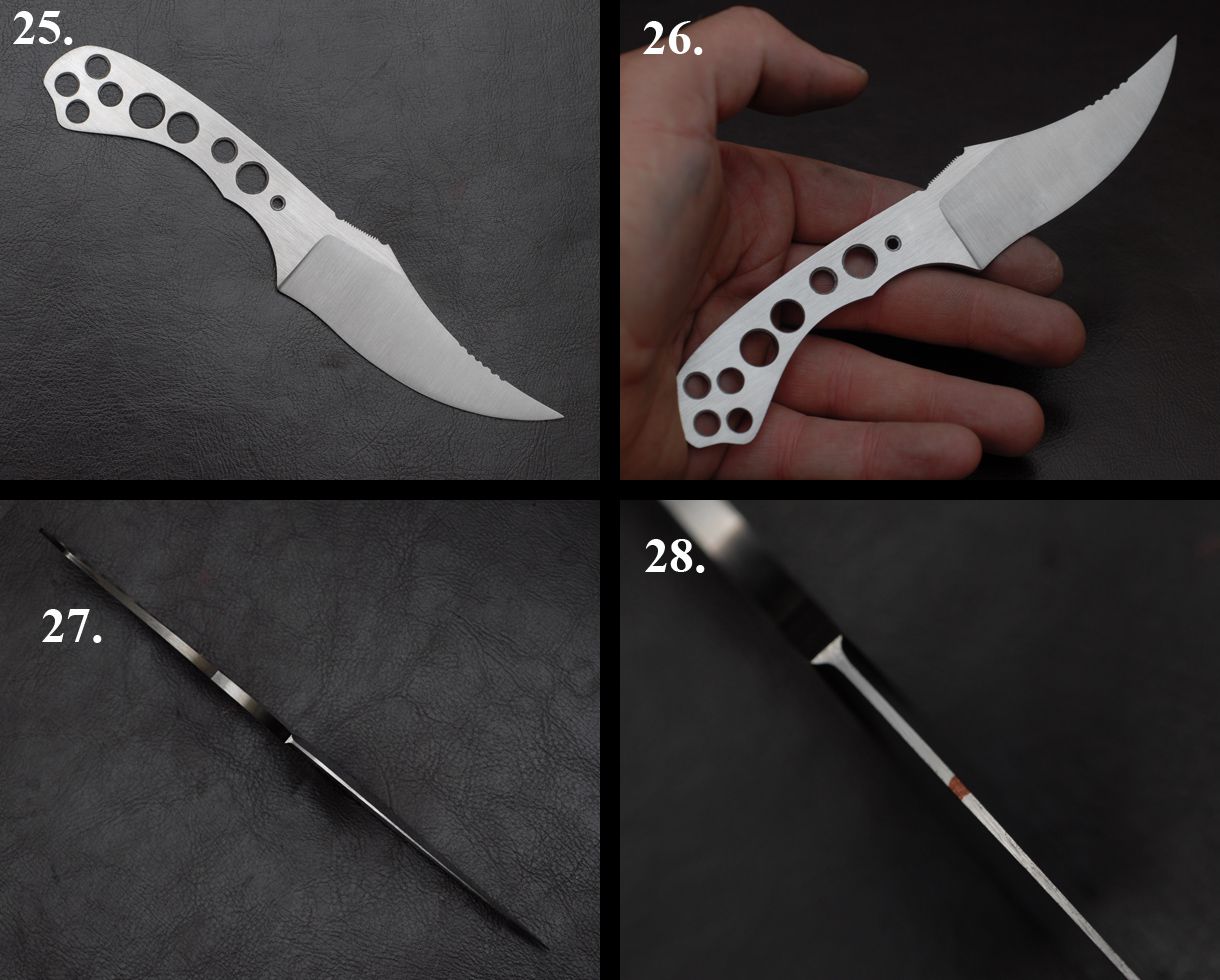
25. Here the blade is Slowly ground down to final thickness, Making sure to keep it cool avoiding work tempering the Edge. I grind with bare hands and dip in water with every pass.
26. Here is the Machine finish in Hand to help with Scale / Size estimation. I finish grind with Gator Belts.
27. This shows the tapered tang and unsharpened edge, The edge gradually tapers to the tip to accommodate the "Safe Choil"
28. I keep referring to the "Safe Choil" it is the portion (Approx 1") of the cutting edge left dull so that one can put their finger on the cutting edge without getting cut. The original Sharpfinger has it (I don't remember what they call it). Based on Codger's experience it is an essential element, I Believe him. The mark shows where the transition from Dull to Sharp will happen.
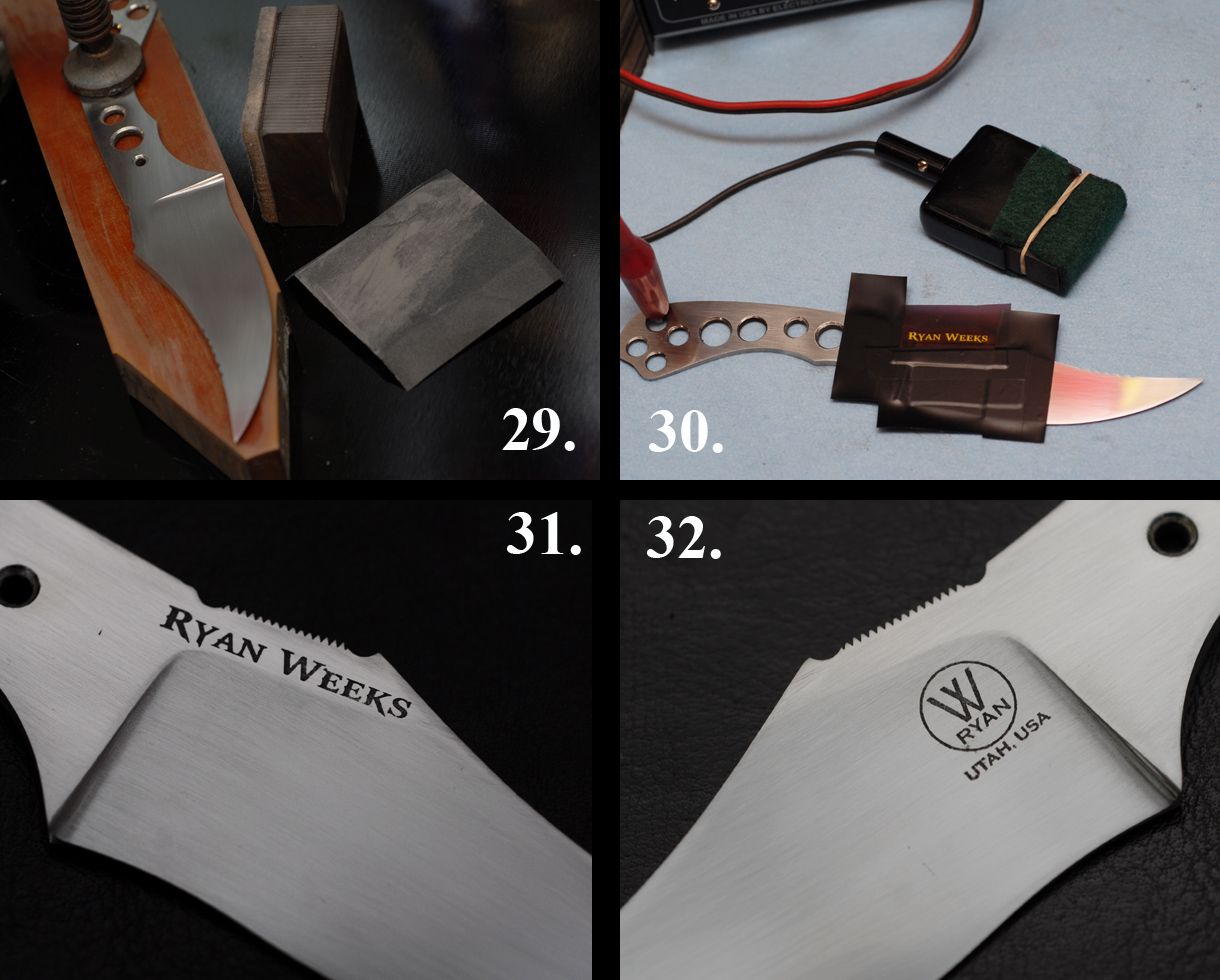
29. This is the Boring time consuming portion of the process - Hand Sanding. I start with 320 Grit and go through about a sheet of sand paper on a blade this size. then move to 600 Grit, I use a bit less of the 600. once I have it Clean I move on to Etching the Makers Mark.
30. Etching Process (I have the Personalizer):
- I wash the entire blade with Hot water and dish soap then dry with paper towel.
- Wipe area with Acetone.
- I Then Elec. tape exactly where I want the stencil
- Attach Negative alligator clip to Tang
- I place the felt on the positive "Etch Block" drizzling a small amount of solution on the pad. Rubbing with finger over Felt then dabing excess off with a paper towel.
- With the Etcher set to "Etch" I do the following
45 Seconds on
15 Seconds off
45 Seconds on
15 Seconds off
- Then switch the Etcher to "Mark"
5 Seconds on
5 Seconds off
4 Seconds on
4 Seconds off
... and so on down to 1
- I remove the stencil and spray with Windex (With Amonia) to neutralize the Solution and dry off with a Paper towel
- I then start hand sanding to sharpen up the mark. Using Windex as a wet agent.
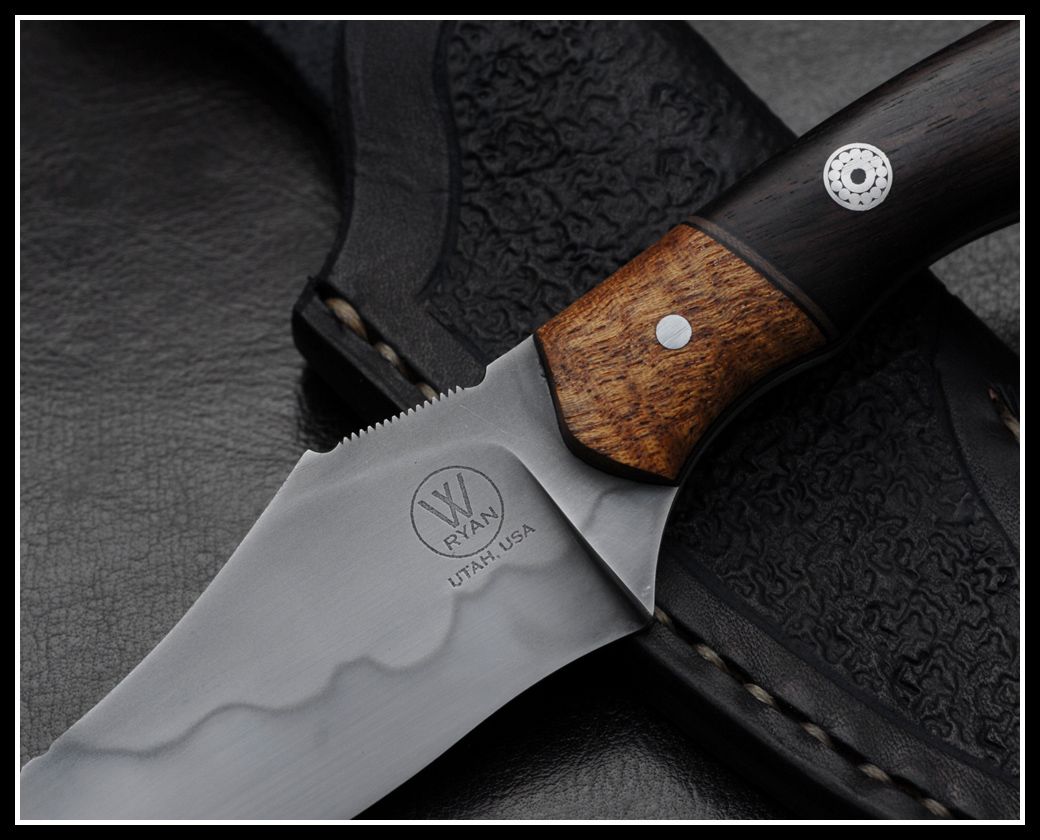
31. I had this Mark laying around from my kitchen Knives... Thought It would look cool under that Thumb jumping. I like it
32. My standard mark
My Hamon Etch Process:
I am doing what I call a "Dirty Hamon" on this knife. Going for High Contrast and less ashi activity, IMO the time involved shooting (and failing) for a "Wheeler" (and Others) Hamon is not worth it on this knife because it is going to see heavy use and get bloody. Most likely the hamon will fade into the Patina over time.
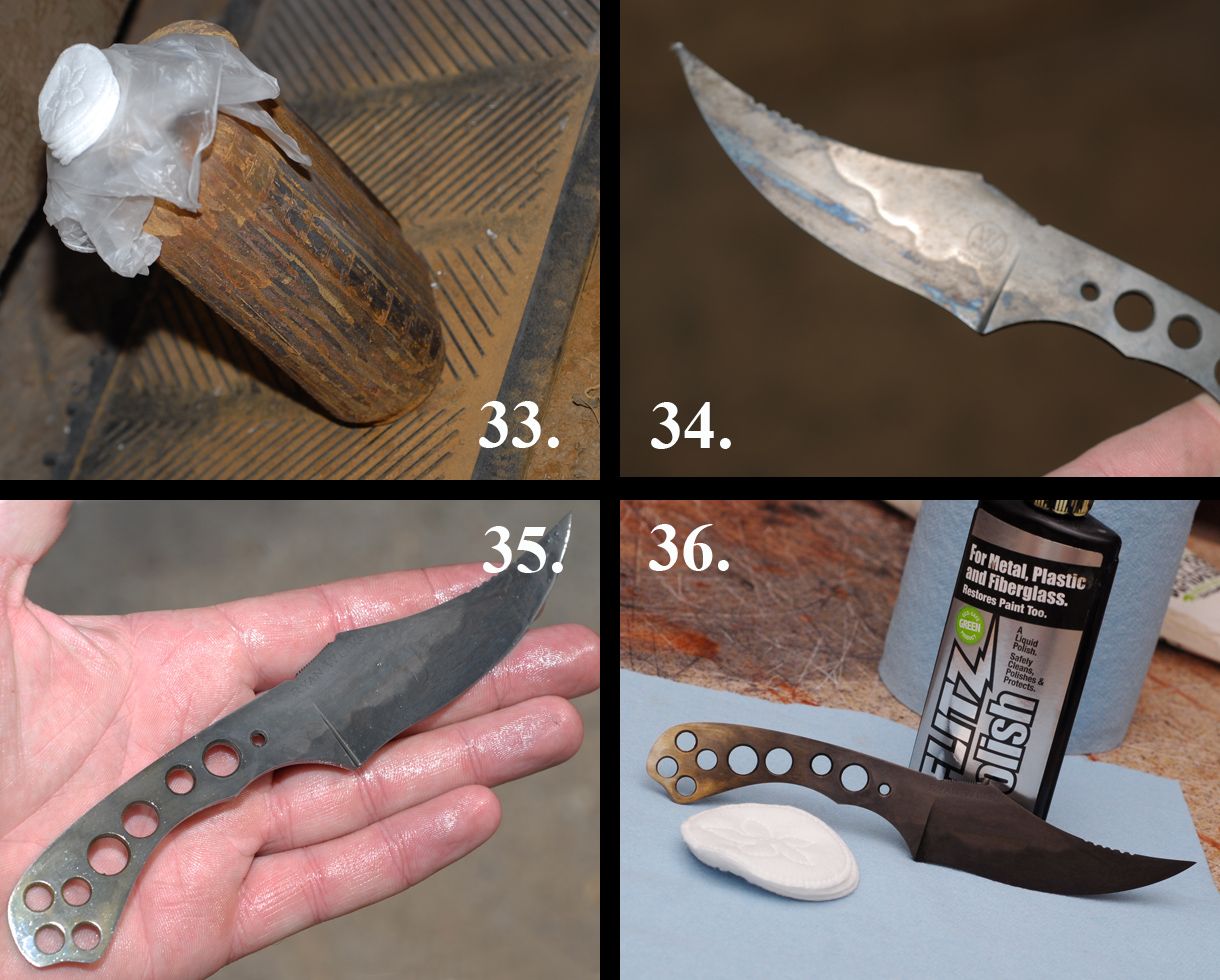
33. Here you see my Nasty Ferric Chloride Tank, with Rubber gloves and Makeup pads.
- After the Makers Mark I hand sand it back to a Clean 600 Grit finish.
- Wash the blade in HOT water and Dish soap, then run out to the shop and start.
- I do a quick Dip in the FC and rub the fluid all over both sides of the blade with a makeup pad to assure I get a clean even etch
- I place the blade back in the solution stirring it around for 5 - 10 Seconds. pull it out and rub both sides again removing the oxides.
- Repeat a few times (5 - 10 Seconds Each time)
- Here is where I am a bit different than others:
- I then do one quick dip and rub one side very hard with the now saturated makeup pad. like I am trying to remove a layer of steel.
- Dip and do the other side....
- Repeat until you have a look you like, Usually I do this (Both sides) 5 times.
- I then spray the Blade with Pure Amonia to neutralize FC and wipe dry with paper towel.
34. This is what the blade looks like after cleaned up with ammonia.
I then (After taking a photo) wash off the blade with water from the outside hose and dry with towel. Wife gets angry when the kitchen sink rusts from Etchant Solution!! Then use Heavy oil to coat entire blade, holes and all to prevent rust from the Ferric Chloride.
35. This is what the blade looks like after the oil is applied
36. I then leave the oil on the blade and polish the blade with Flitz.
FOR A MORE Detailed Hamon Process Check my Earlier Post:
(The link will open a New page to view)
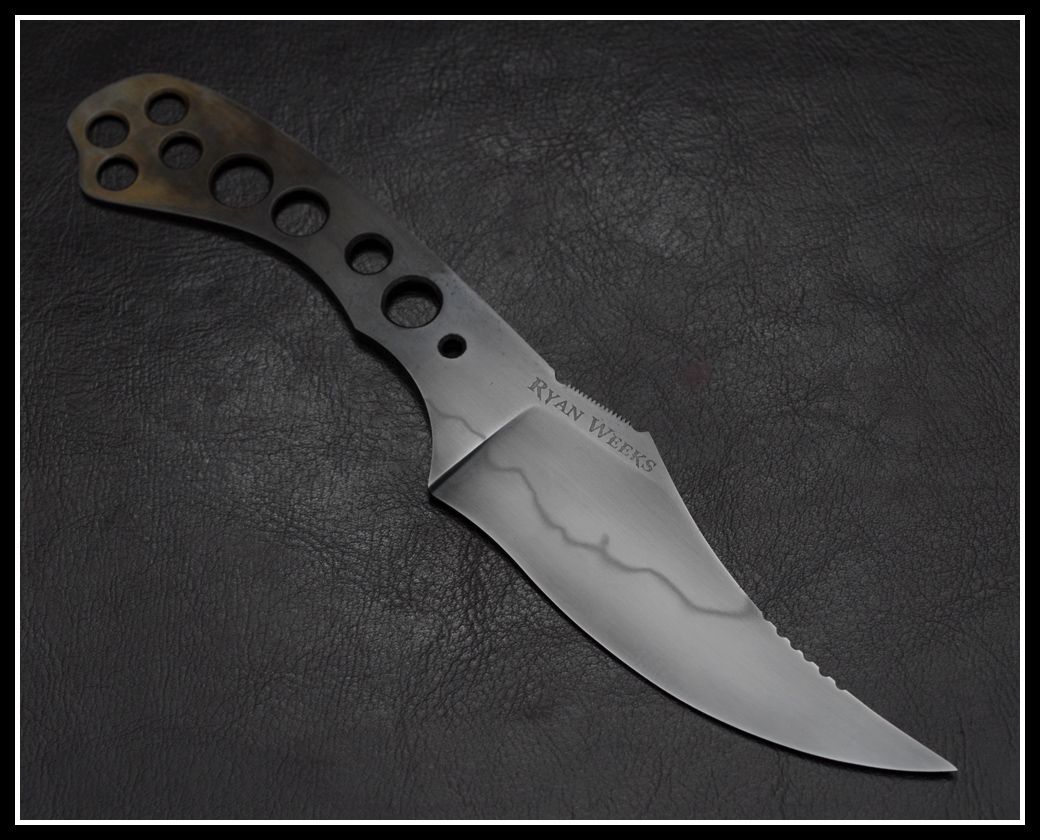
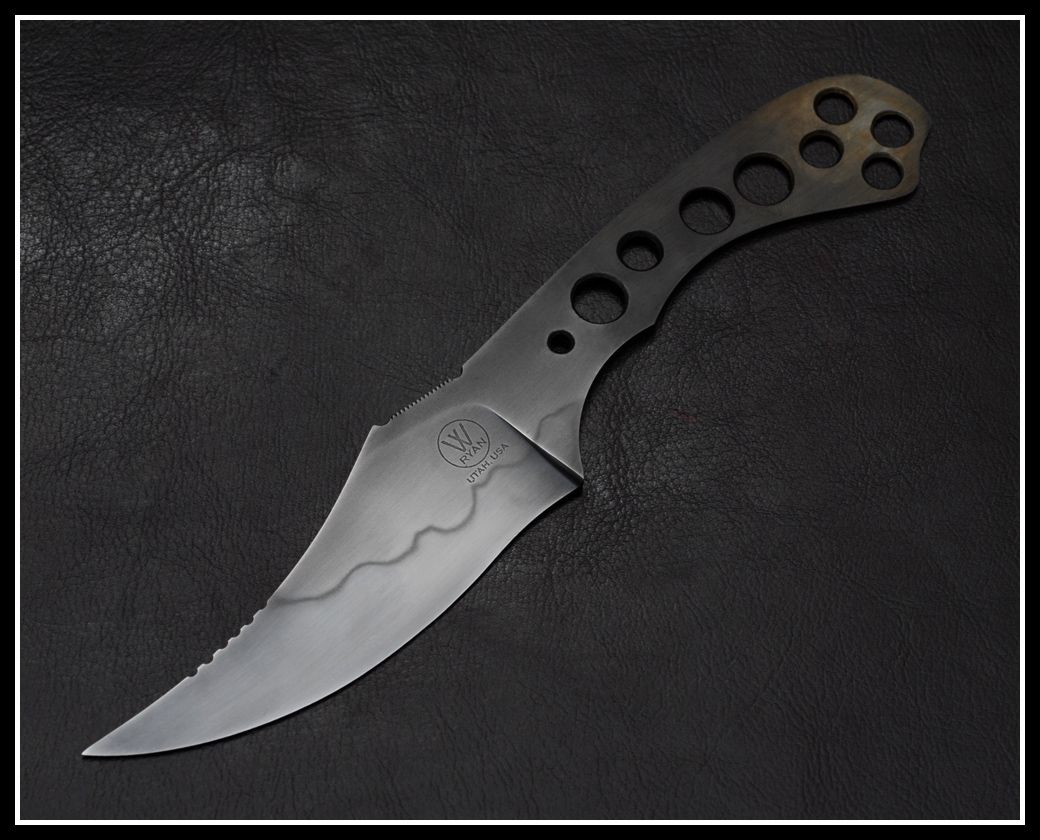
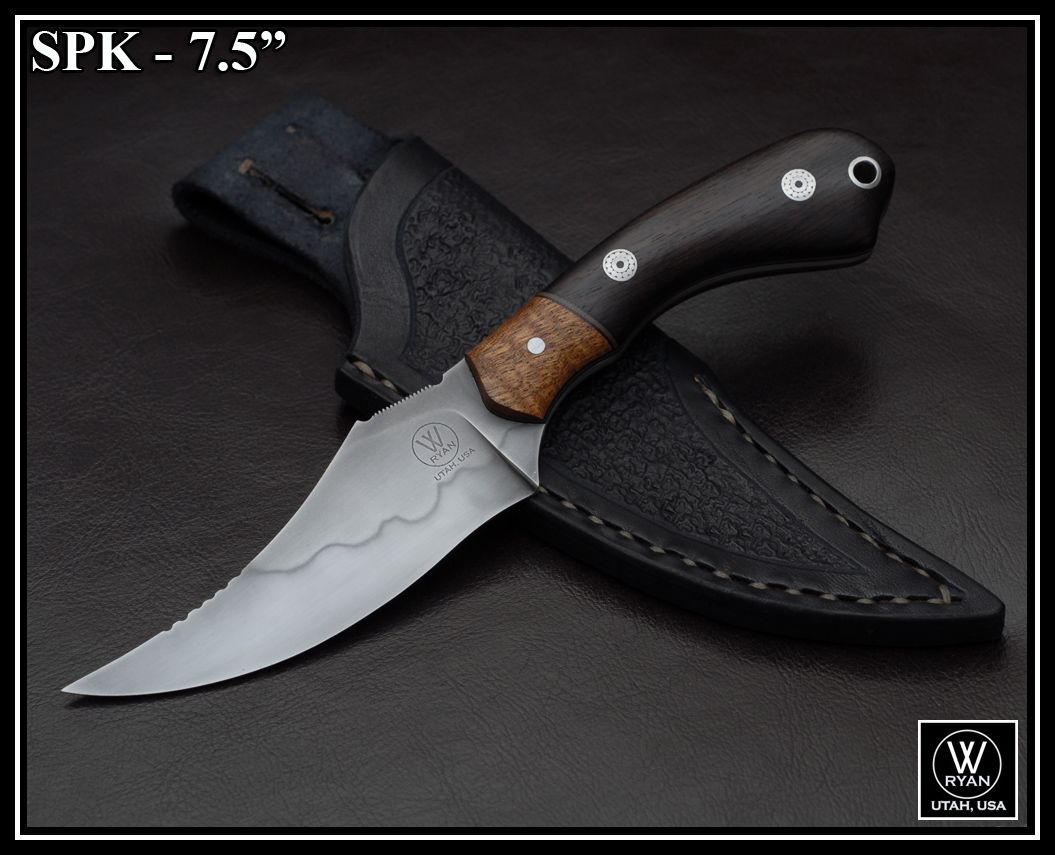
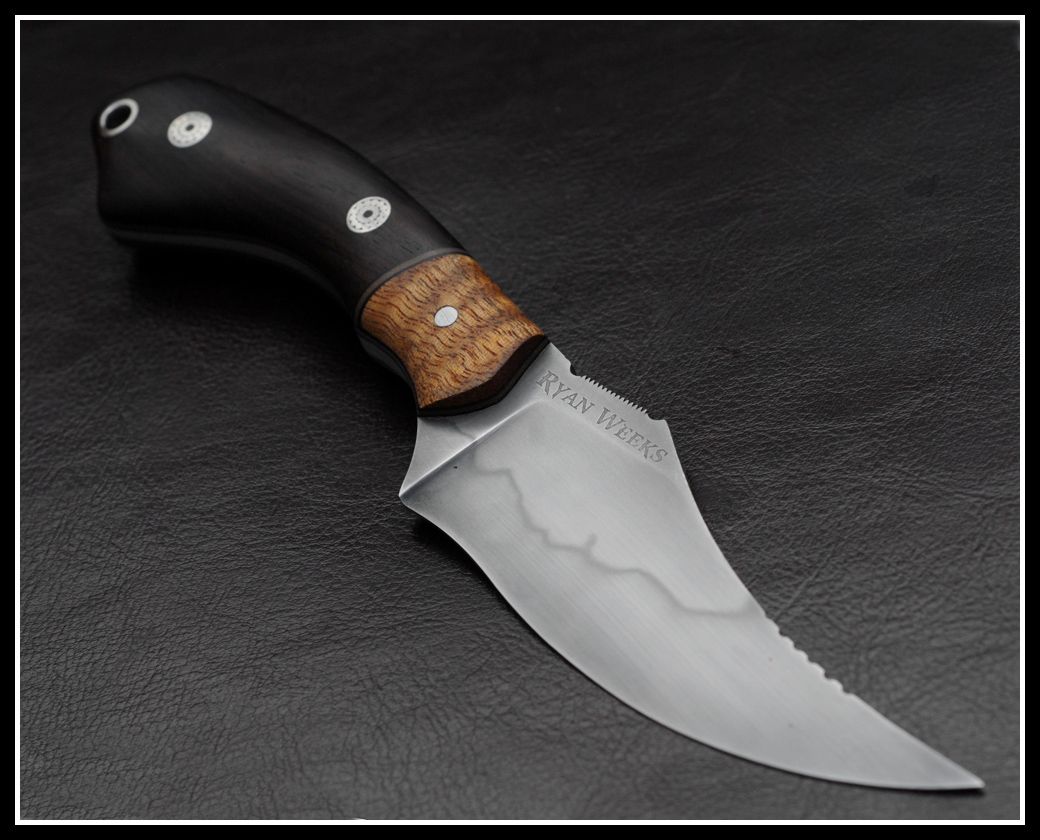
Here is the finished blade ready for Handle work!
Handle Work:
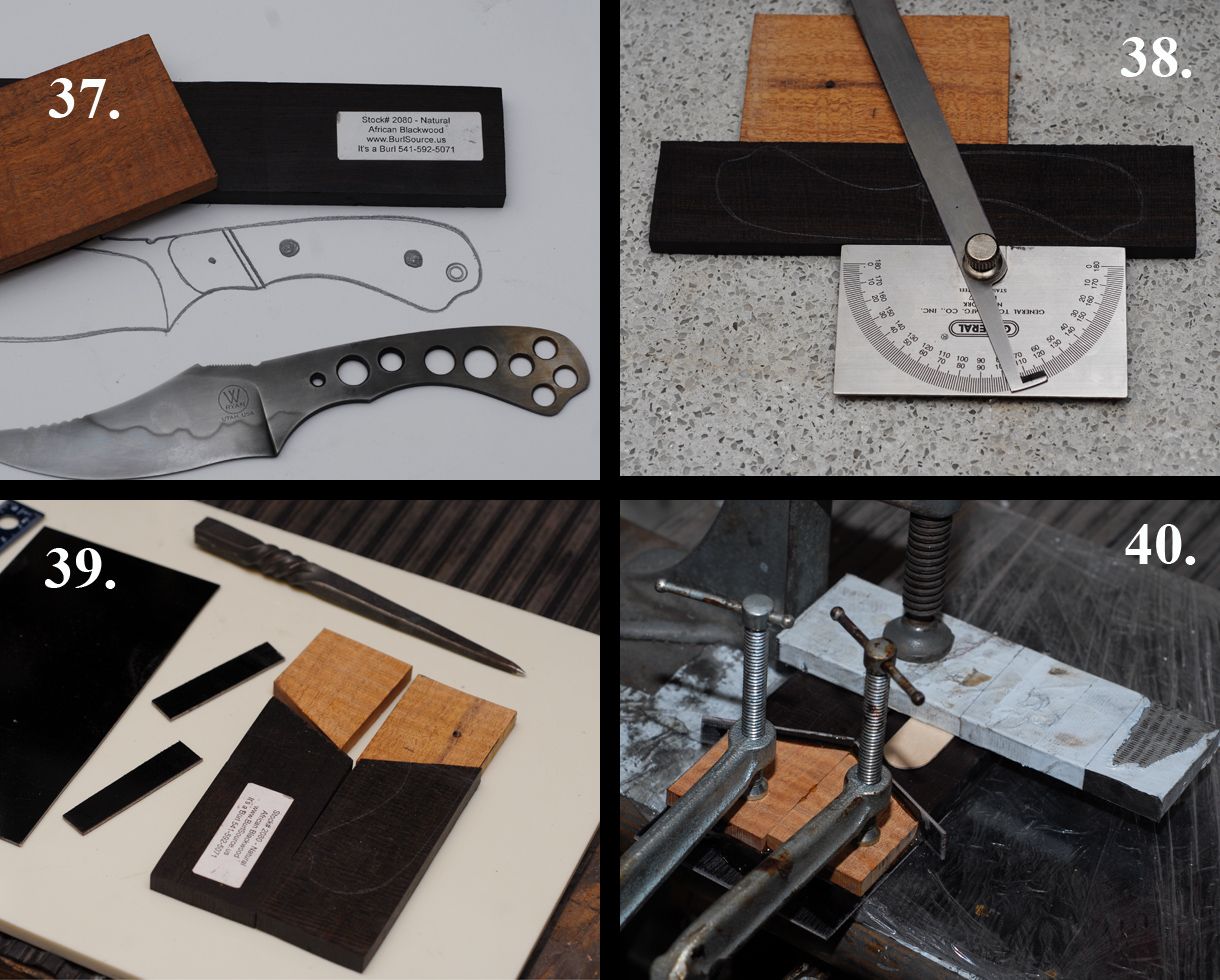
37. I am a very visual and hands on person. I always trace the finished tang onto paper, mark the pins and pull my materials together. Looks like African Blackwood and Curly Mahogany is calling!
38. I then trace the tang onto the material and get my angles right, then cut the materials on a Precise chop saw. I only have to cut each piece once then flip one half so the angles are right
39. Here I have all the pieces together, including the liner and spacers. rough sand all the sides that are going to be epoxied together and wipe down with acetone. You will notice the worm hole in the Mahogany, I thought I could work around it... Nope. Luckily I had another small piece that I used instead.
40. This is where I glue up the scales with two part epoxy. It takes a bit of work to get everything straight, it is critical to get all angles and edges together here. I use extra epoxy to make sure all voids are filled. I do this all on a thick piece of G10 wrapped in Saran Wrap to make sure the liners are dead flat.
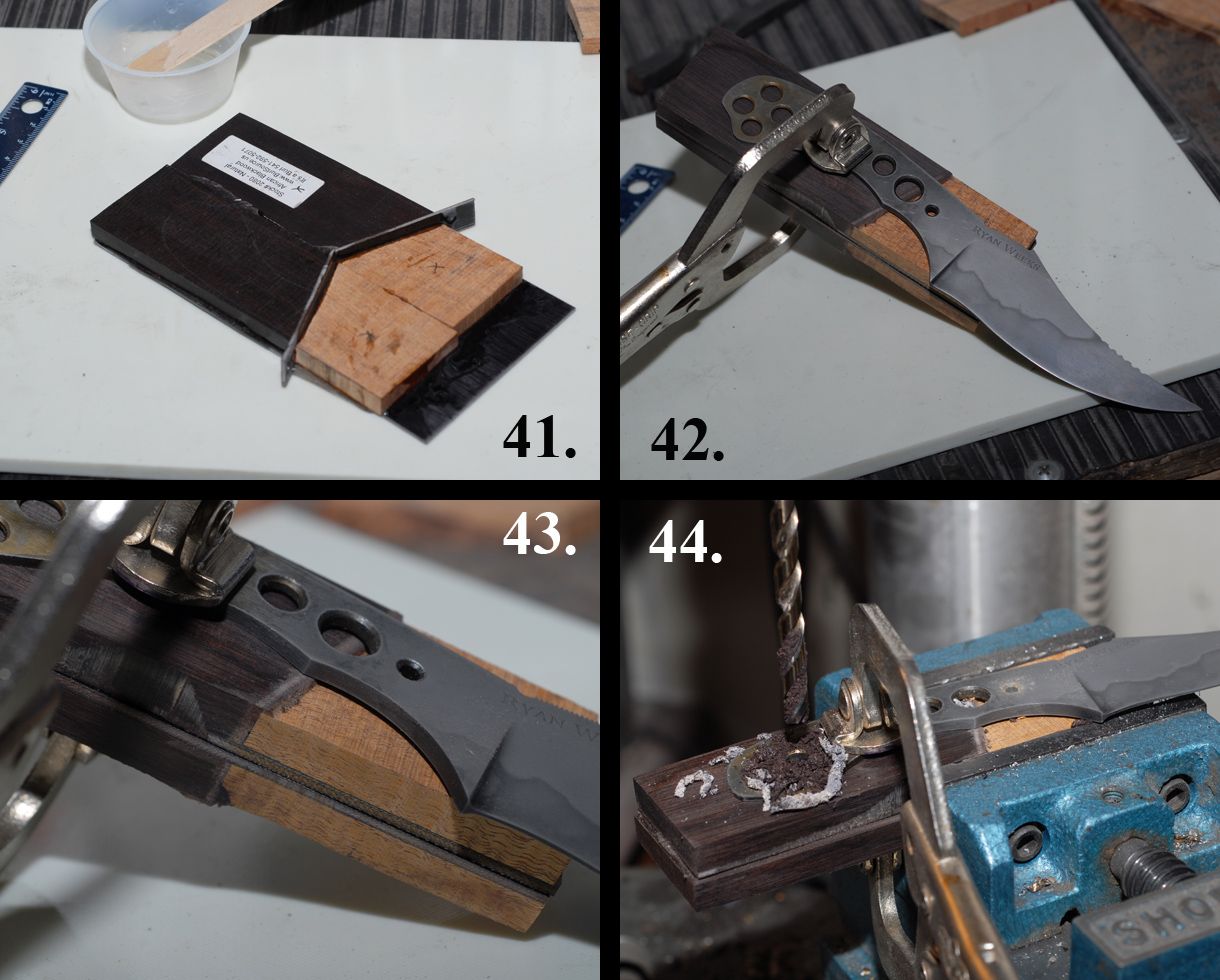
41. This is what it looks like after the epoxy has cured. I then cut the individual scales out and cut off the scrap.
42. I then stack the scales liner to liner and overlay the blade EXACTLY where I want it on the scales.
43. I make sure to have the top and bottom spacer lined up before I clamp it all up.
44. I then clamp it Square in my drill press vise and drill through the front 1/8" hole and the back 1/4" hole. these will be my alignment holes so I can do the rest of the work through the liner side.
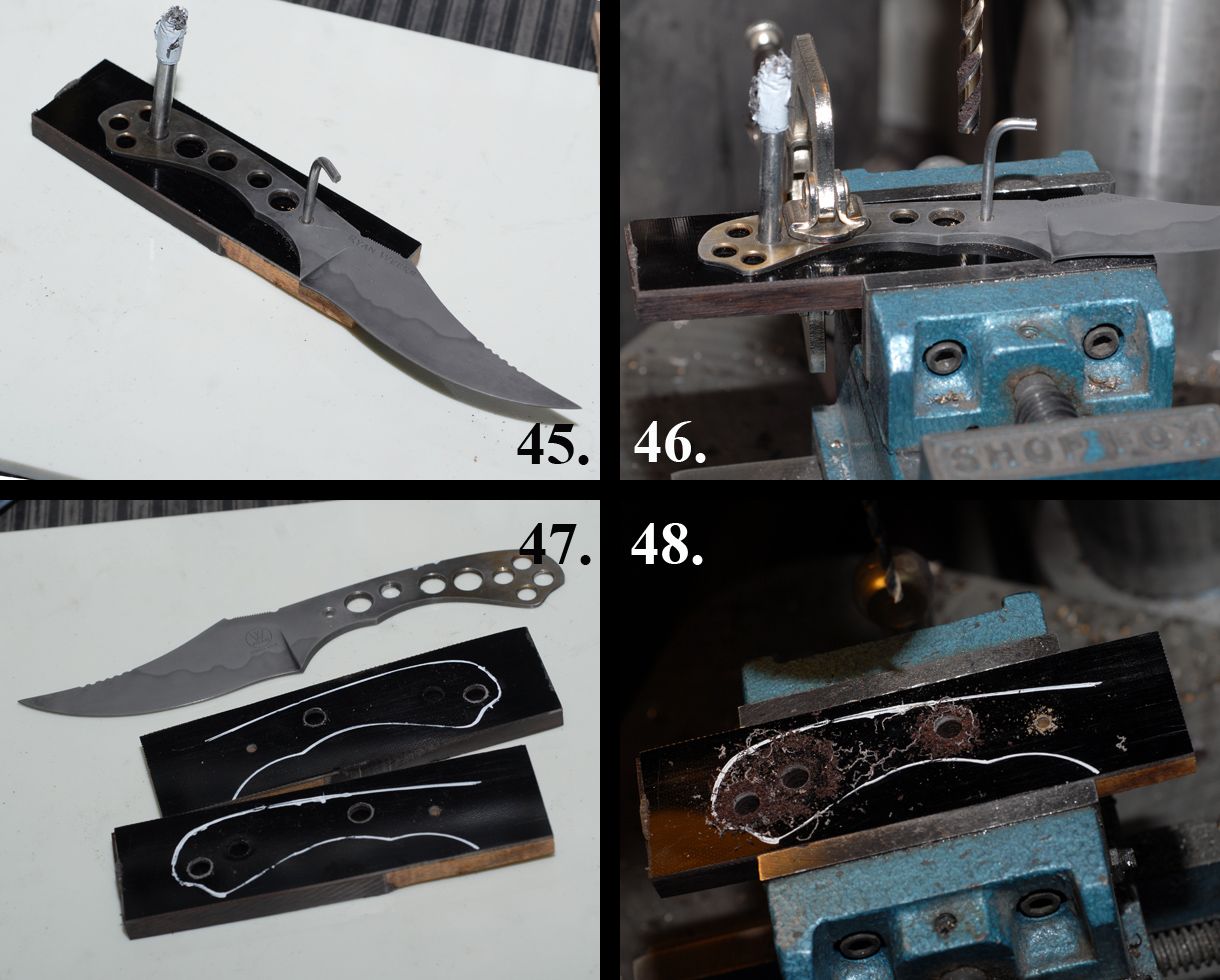
45. I then line the blanks up on the liner side, and Clamp it up in place
46. Put the scale back square in the vise and drill the rest of the Pin Holes
47. While I have it clamped in place I use a White Out pen to trace around the Tang.
48. I then put the scales back in the Vise (Squared Up) and drill out the holes with the #F and #30 bits
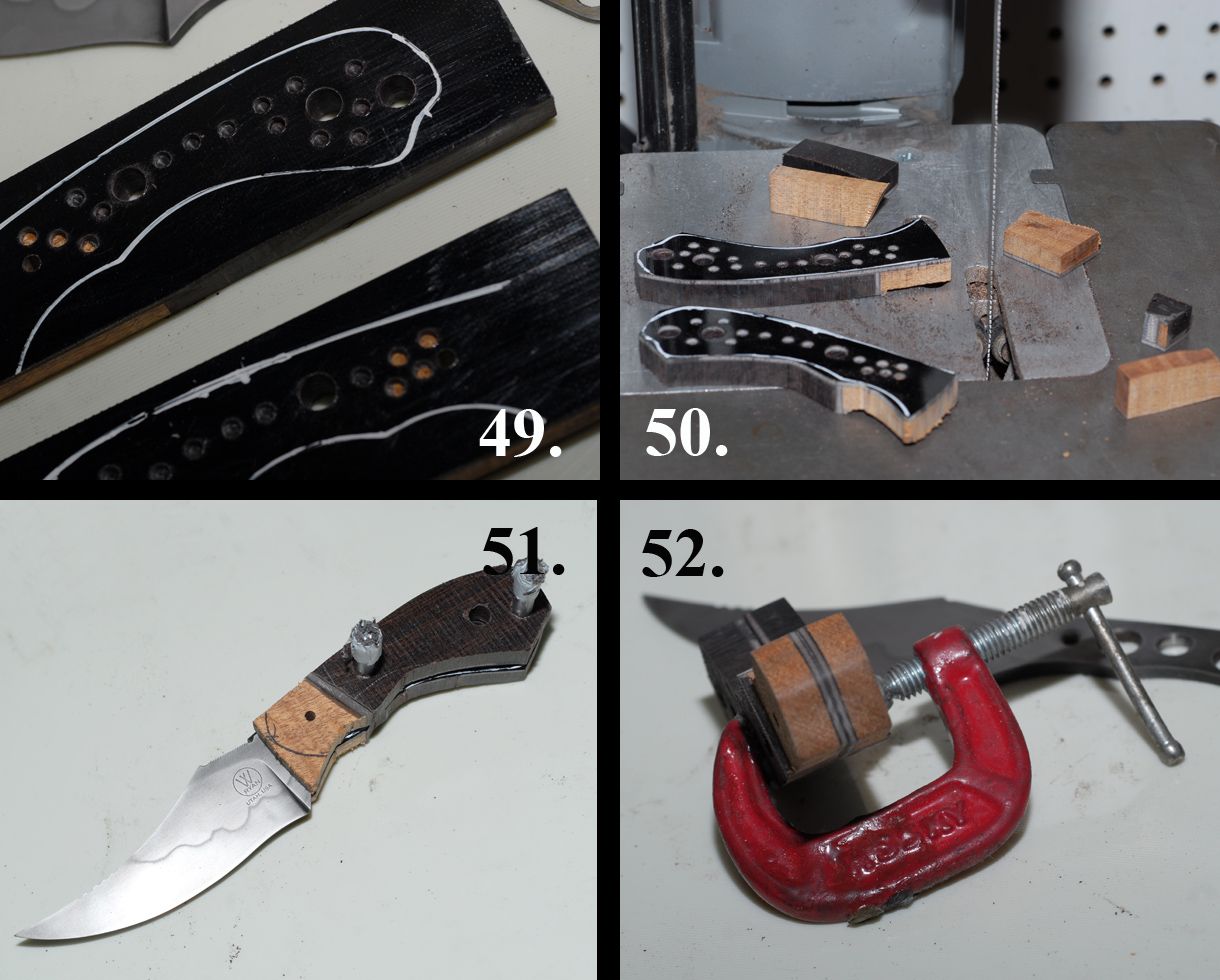
49. I then make small holes in the liner, making sure to penetrate the liner so that the AcraGlas Epoxy grabs the wood scales for extra strength. Don't go too deep though.
50. I then cut out the excess material on the Band Saw
51. I then get my assembly pins and see where I want to cut the Face of the Bolsters
52. I then cut and sand to final the face of the bolsters. I will not be able to access this after it is attached to the blade.
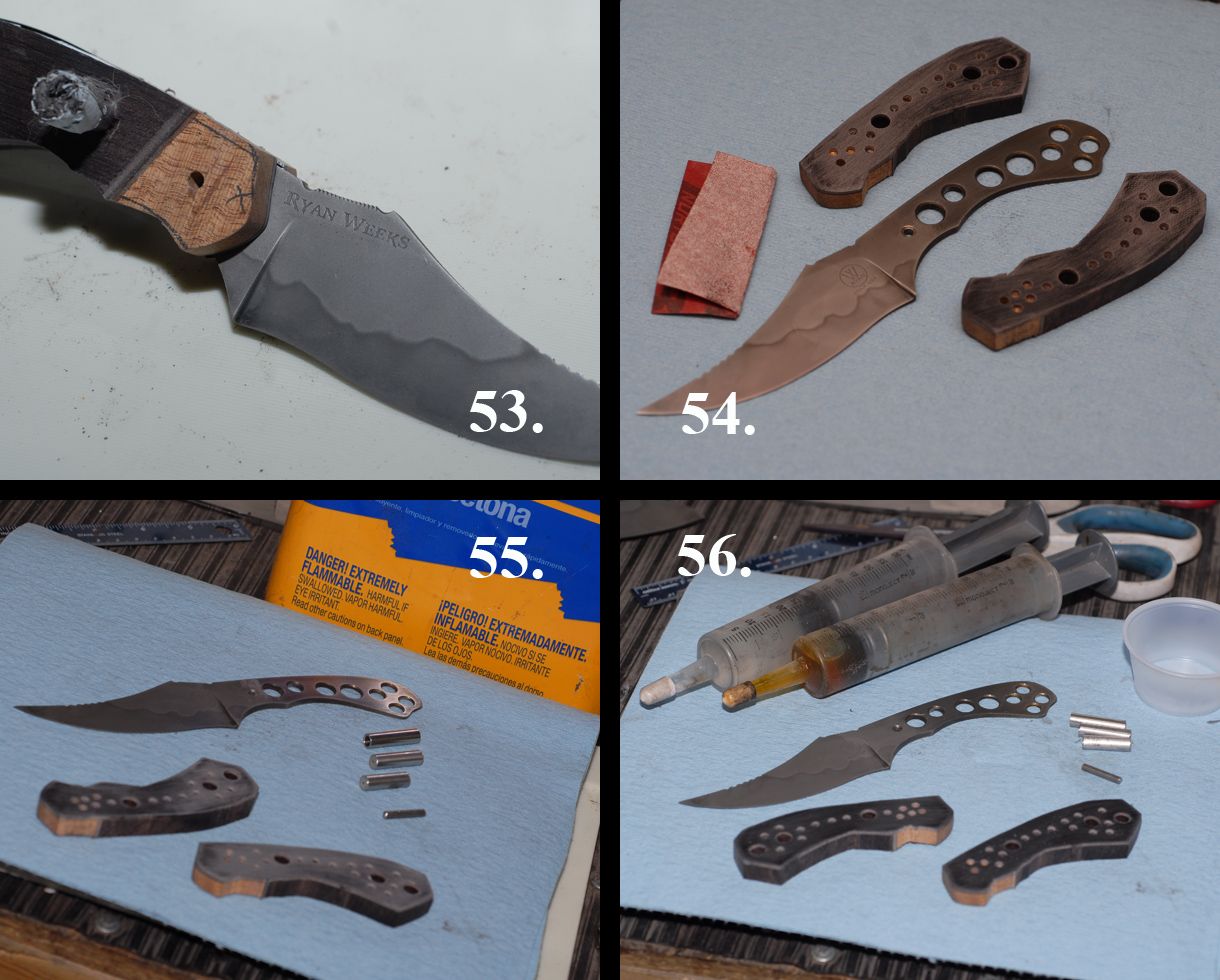
53. I slide in the assembly pins and check the face of the bolster to make sure I have it where I want it.
54. I then roughen up all the surfaces that will be glued
55. Cut my Pin Stock to size. I am using 1/8" Nickel, 1/4" Mosaic's and Stainless Tubing. roughen up the pin stock and wipe everything down with Acetone.
56. I prefer Acra-Glas as an Epoxy... Mix it up 4:1
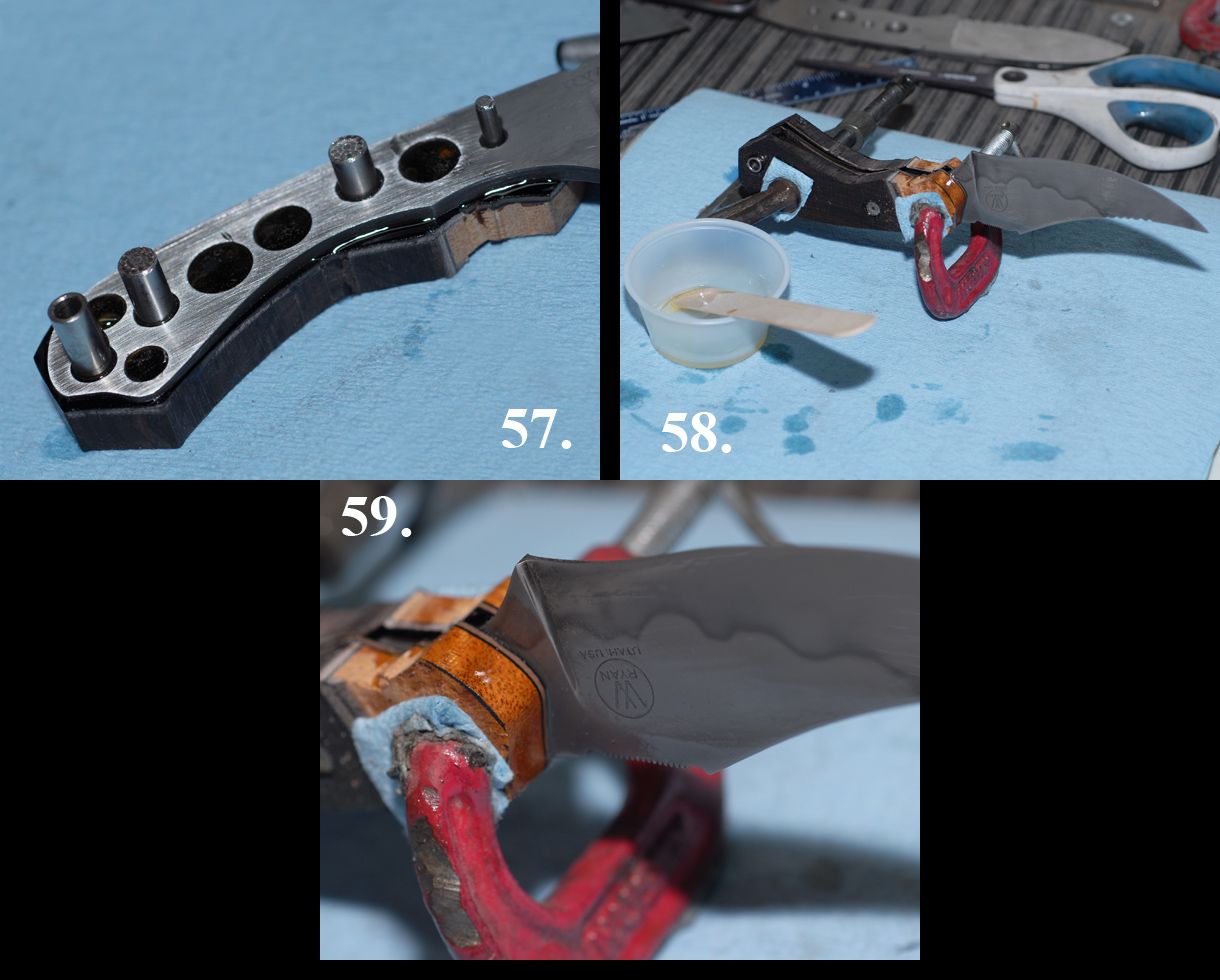
57. I then spread epoxy on one scale making sure to fill all the little holes, Insert Pins in the scale then slide the blade over the pins. Epoxy the other scale filling the holes and slide it in to place over the pins.
58. I use strips of paper towel between the clamps to avoid permanently attaching the clamp to my pretty wood.
59. I then take a small towel covered in Acetone and wipe the Blade and Bolster face. Making sure there is no epoxy in the area. I then take some 3 in 1 oil and coat the entire blade and bolster face to help clean it up.
24 Hr Cure time started at Noon... Time to catch up on my day Job!
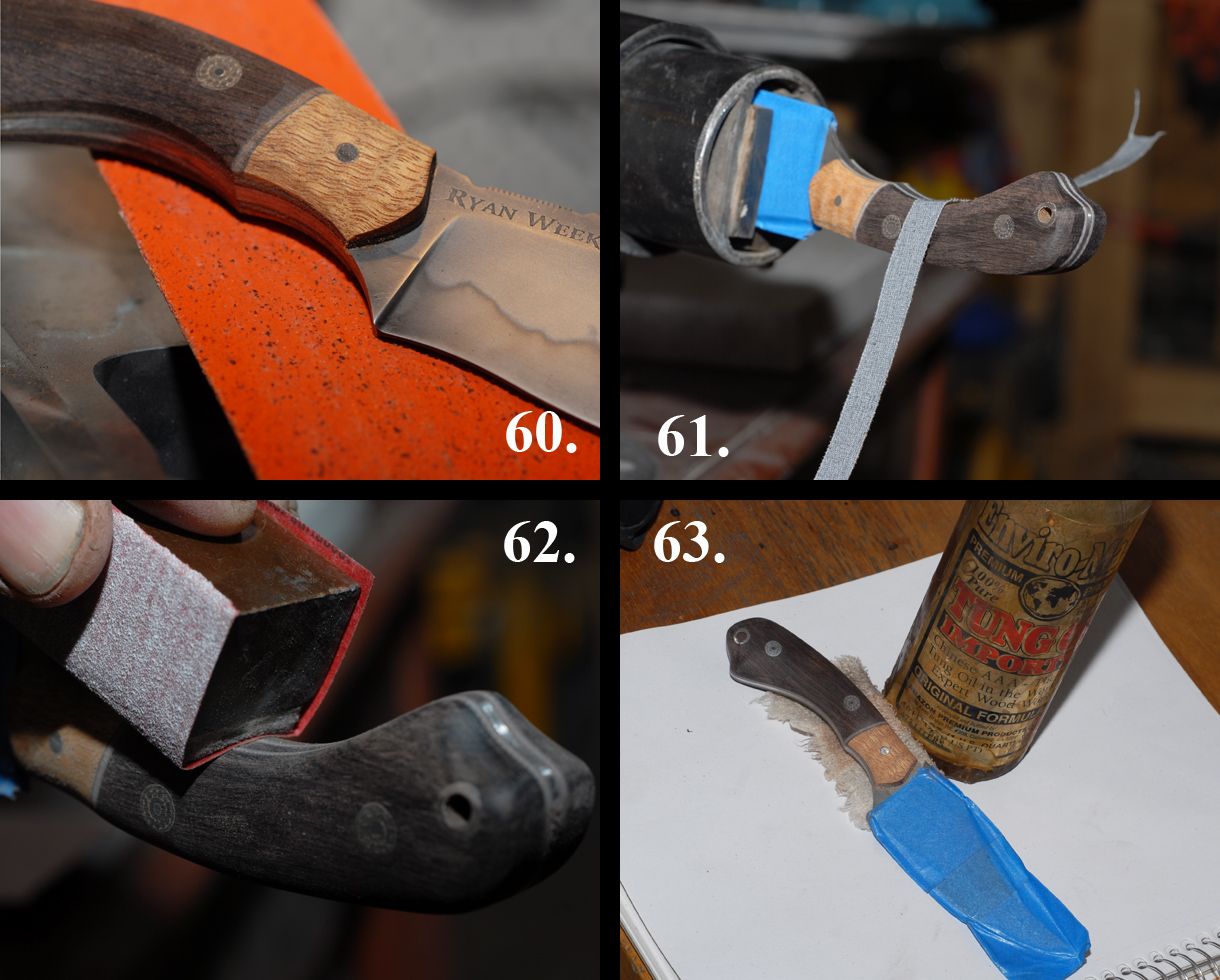
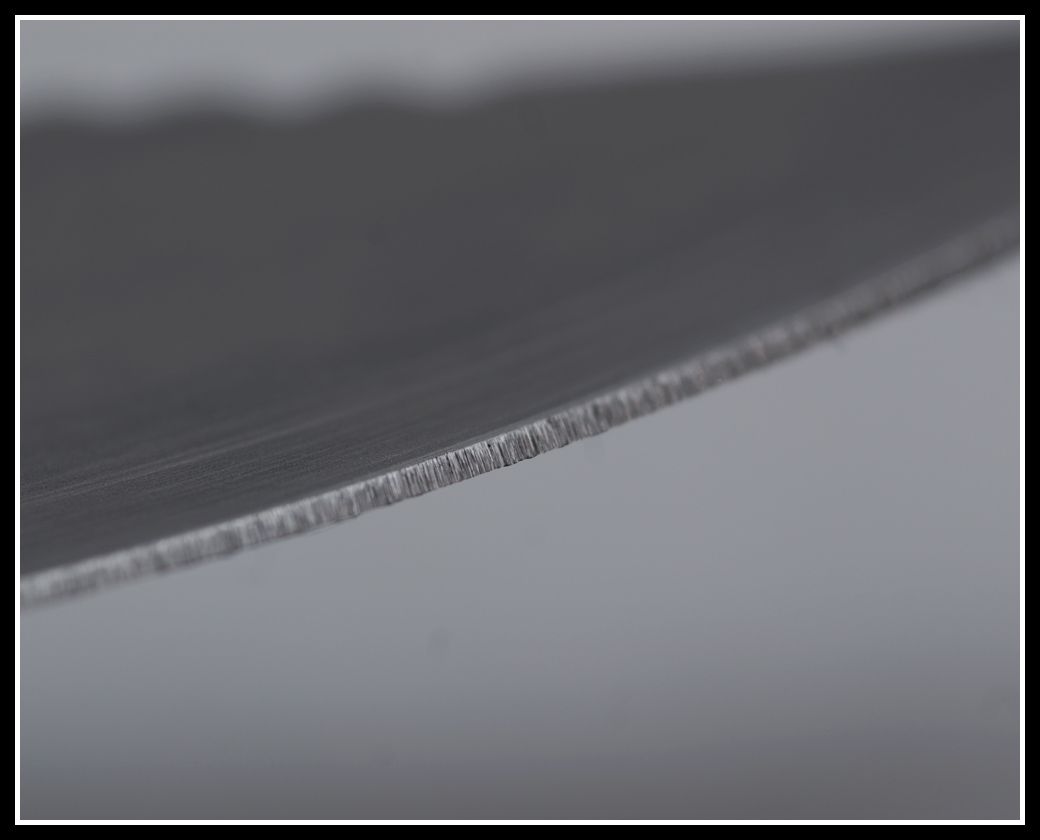
Here is a close up of the cutting edge, very toothy and cuts extremely well with a slicing motion.
THE PASSAROUND
I recieved some great input on design features before and during the creation of this knife. I felt that it needed to put into the hands of those that know and do. 5 great people stepped up and agreed to take this knife and put it through its paces... as the feedback comes in I will update this info below.
Mike - "33875"
Oregon, USA

I have had the pleasure of having it for a week to admire though, and although I didn't get to use it for it's intended purpose, I have developed some thoughts on this one. I want to thank Ryan for allowing me to spend time with this one...
I tried to take good pictures of this knife, but they truly don't do it justice.
I usually don't have a lot of patience when opening a box, that contains a new knife. Here she is on her first trip from home.


I can't honestly tell you how many knives I have owned over the years, but I do know there have been very few that I immediately bonded with, as soon as I got them. This knife is one of those few.
It is also one of the few that I have grown to like even more, every time I held it...
I have to many pictures to put everything in one reply, so bear with me
Knowing that Ryan was asked to do this knife for a group of bow hunters, I wanted to take a few pictures that tied it to archery equipment.


And finally, a few pictures of the knife in hand, and some thoughts on this knife...


The first thing I noticed when I unboxed this knife was, the outstanding workmanship. It looks great in the pictures Ryan posted, but it is even nicer in hand.
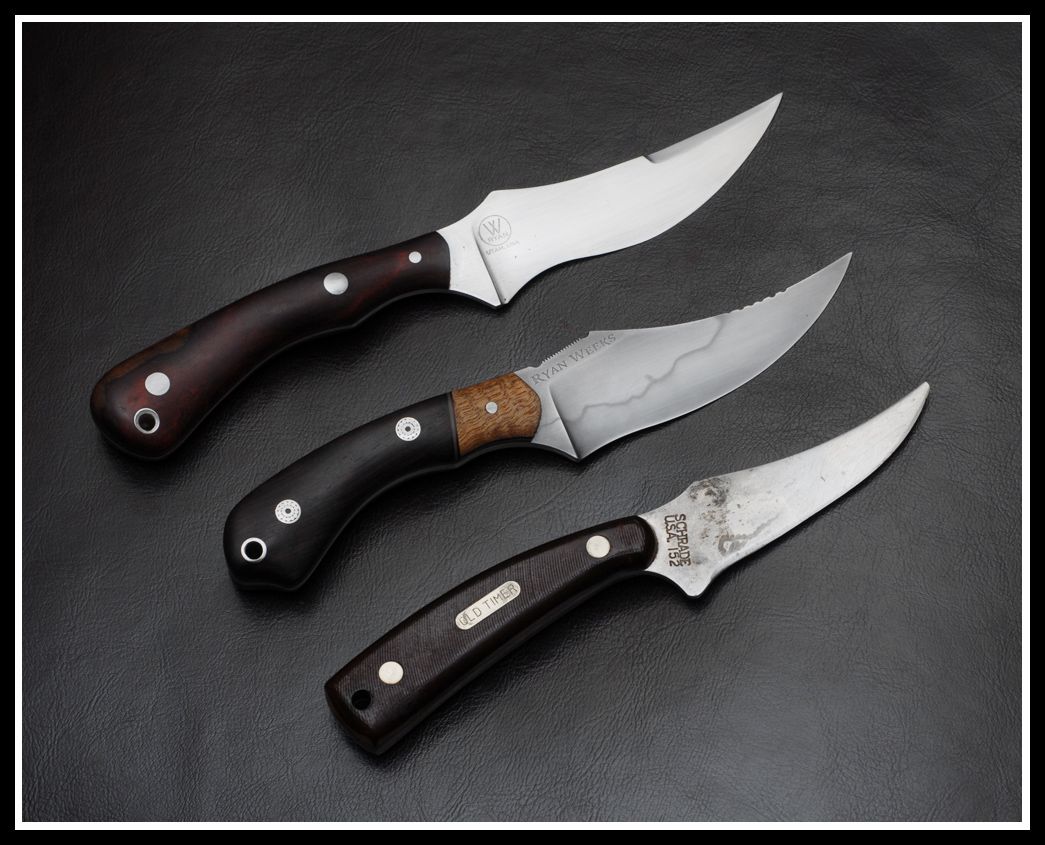
Being someone who has liked the original Sharpfinger for quite a few years, I never thought of trying to improve on it.
IMHO, this knife is a great tribute to the original.
I have fairly big hands, and it is very comfortable for me. As far as the notch on the bottom/ rear of the handle, it didn't really make much difference when I held it. I have a feeling, someone with smaller hands may notice it more though.
When I first started playing around with it, I tried the usual shave the arm, and push cut some paper. It didn't work well for either of those tasks. As I thought more about it, I remembered the toothy edge that Ryan put on the knife.
I contacted him and asked about this. He said that was indeed why it didn't do well with those tasks. But, he also reminded me that the knife was mainly being done for processing game.
I didn't have any game, but we bbq'd chicken last night for dinner, and the wife overcooked it a little, so it was kinda dry.
I used the knife to cut across the grain, and it worked great. I also used it to cut up some fairly thick cardboard, and it took care of that task with ease...
The chicken didn't have any sauce on it, just salt and pepper. As soon as I finished eating, I cleaned the blade, and noticed I had been the first one to
leave a mark. It developed patina very quickly. But, that is one of the things a lot of us like about 1095
I had just never done it on a knife this beautiful...
I've never owned a knife with an edge quite this toothy before. I have a feeling if I would have gotten to use it on game, I would have appreciated it, but I guess after all these years, I'm use to having a polished edge.
I would probably order one with a polished edge, but that in no way means this edge wouldn't work very well for its intended purpose. I'm just a little to old to change my ways
I have to say, anyone would be proud to own this knife. After seeing Ryans work up close and personal, I am seeing a new knife in the future from him.
I hope I didn't leave anything out.
The first thing I noticed when I unboxed this knife was, the outstanding workmanship. It looks great in the pictures Ryan posted, but it is even nicer in hand.
Being someone who has liked the original Sharpfinger for quite a few years, I never thought of trying to improve on it.
IMHO, this knife is a great tribute to the original.
I have fairly big hands, and it is very comfortable for me. As far as the notch on the bottom/ rear of the handle, it didn't really make much difference when I held it. I have a feeling, someone with smaller hands may notice it more though.
When I first started playing around with it, I tried the usual shave the arm, and push cut some paper. It didn't work well for either of those tasks. As I thought more about it, I remembered the toothy edge that Ryan put on the knife.
I contacted him and asked about this. He said that was indeed why it didn't do well with those tasks. But, he also reminded me that the knife was mainly being done for processing game.
I didn't have any game, but we bbq'd chicken last night for dinner, and the wife overcooked it a little, so it was kinda dry.
I used the knife to cut across the grain, and it worked great. I also used it to cut up some fairly thick cardboard, and it took care of that task with ease...
The chicken didn't have any sauce on it, just salt and pepper. As soon as I finished eating, I cleaned the blade, and noticed I had been the first one to
leave a mark. It developed patina very quickly. But, that is one of the things a lot of us like about 1095
I had just never done it on a knife this beautiful...
I've never owned a knife with an edge quite this toothy before. I have a feeling if I would have gotten to use it on game, I would have appreciated it, but I guess after all these years, I'm use to having a polished edge.
I would probably order one with a polished edge, but that in no way means this edge wouldn't work very well for its intended purpose. I'm just a little to old to change my ways
I have to say, anyone would be proud to own this knife. After seeing Ryans work up close and personal, I am seeing a new knife in the future from him.
I hope I didn't leave anything out.
Thanks again Ryan for letting me enjoy this beauty,
Mike
Mack - "Protourist"
California, USA
I got it and I must say, I'm more impressed than I had expected. This fits my hand as if it had been made for it. I can't find a flaw in the fit and finish yet but I will be going over it much more closely. I really doubt that I'll find anything though.
After falling in love with Sharpfingers, I didn't think they could be improved on. I was wrong. Very wrong. This is a work of art that will be a dream to work with.

More to come when I get some more cutting time....
>>> WARNING DECEASED CRITTER CONTENT FOLLOWS <<<
Kent - "mewolf1"
Minnesota, USA
The blade made it here today and could hardly stand it not to open it , but I waited til my girl said "well, are you gonna open it?" Drove her crazy. My first impressions were admiration of the work. Ryans craftsmanship is beautiful and the leather work stout for a long life if not many lives. The balance of this knife is spot on IMO and fits my hand the way I like a knife, creating an extention, meaning it feels "natural". After getting a paper towel to wipe the drool off my face I grabbed some pork loin out of the fridge and cut it up.


By the end of the first piece I found that I wasn't thrilled by the micro serrations. It felt draggy to me so I pulled it through a hone. Four times though lightly.This made a world of improvement and I cut up the rest.


Next I got out some Salmon I just cured up.Had to make sure it turned out OK.


This was not this blades intended use obviously, but I had to try it. Gravlox needs a thin blade.
I then went outside to clean a couple of Squirrels I picked off the bird feeder.
The first one I did across the back method and the blade zipped right through. Squirrel hide is tough stuff!


The second one I cased skinned just to use the knife more.


All in all, the game prossessing went as expected but there is more work for this knife on bigger game as pork loin and squirrel is not a challenge for this blade.
More to come.
To sum up my experience with this knife I have to say I'm honored to be apart of this pass around. The pinky dent didn't have any effect on the useability for me, but adds to the look. In taking apart the front shoulders of a deer, the front jimping is a non issue as well; not that they were any trouble, just that I am indifferent to them. The balance is awsome with this knife and the heft of such a small blade is very nice. I still maintain though that a razor edge, without safety, would be scary wicked. I say that with the utmost of respect, as this knife has so many ways to be customized without really changing the labor for the blade master i.e., "a little here, a little there".
I also forgot to say before, that from the first time I saw this knife everything says to me "out west". It is obviously gorgeous and is very useful!!
This was a bit slushy but came apart just the same.


Shot a nice Buck yesterday. Have lots of pics of knife in use. Butcherin to follow in the coming days.
The blade made it here today and could hardly stand it not to open it , but I waited til my girl said "well, are you gonna open it?"
Drove her crazy. My first impressions were admiration of the work. Ryans craftsmanship is beautiful and the leather work stout for a long life if not many lives. The balance of this knife is spot on IMO and fits my hand the way I like a knife, creating an extention, meaning it feels "natural". After getting a paper towel to wipe the drool off my face I grabbed some pork loin out of the fridge and cut it up.By the end of the first piece I found that I wasn't thrilled by the micro serrations. It felt draggy to me so I pulled it through a hone. Four times though lightly.This made a world of improvement and I cut up the rest.
Next I got out some Salmon I just cured up.Had to make sure it turned out OK.
This was not this blades intended use obviously, but I had to try it. Gravlox needs a thin blade.
I then went outside to clean a couple of Squirrels I picked off the bird feeder.
The first one I did across the back method and the blade zipped right through. Squirrel hide is tough stuff!
The second one I cased skinned just to use the knife more.
All in all, the game prossessing went as expected but there is more work for this knife on bigger game as pork loin and squirrel is not a challenge for this blade.
More to come.
To sum up my experience with this knife I have to say I'm honored to be apart of this pass around. The pinky dent didn't have any effect on the useability for me, but adds to the look. In taking apart the front shoulders of a deer, the front jimping is a non issue as well; not that they were any trouble, just that I am indifferent to them. The balance is awsome with this knife and the heft of such a small blade is very nice. I still maintain though that a razor edge, without safety, would be scary wicked. I say that with the utmost of respect, as this knife has so many ways to be customized without really changing the labor for the blade master i.e., "a little here, a little there".
I also forgot to say before, that from the first time I saw this knife everything says to me "out west". It is obviously gorgeous and is very useful!!
This was a bit slushy but came apart just the same.
Shot a nice Buck yesterday. Have lots of pics of knife in use. Butcherin to follow in the coming days.
This is the biggest Whitetail I've ever shot!
First things first; off with his nuts! This went quick with this blade.


Cut down to the Pelvis

Time to head up the belly; all of this is instruction to my son as this is taking place and he does the photo shoot.

This is the point in gutting I would like a full sharp blade.

I drove the blade into the center of the pelvis and rocked it to try to get it to start splitting to no avail!! Not one knick is in the blade after working the bone!! Awesome knife!! I did finally give up on trying to split the pelvis and went on to the gut removal. Even after the workout on the pelvis, this knife cleanly removed the diaphram and wind pipe. Everyone one needs to remember that all of this is my opinion and does not reflect upon the HIGH QUALITY of Ryans work, but I believe that a razor edge would have made this a much quicker job. The thickness of this knife is something one can rely on FOREVER if cared for properly
My son is far more photogenic than I

1. Do you like the fine jimping or would prefer heaver / Bigger notches
RYAN W:
2. What are your thoughts about the re-curve in the cutting edge, would you keep the re-curve but fully sharpened?
RYAN W:
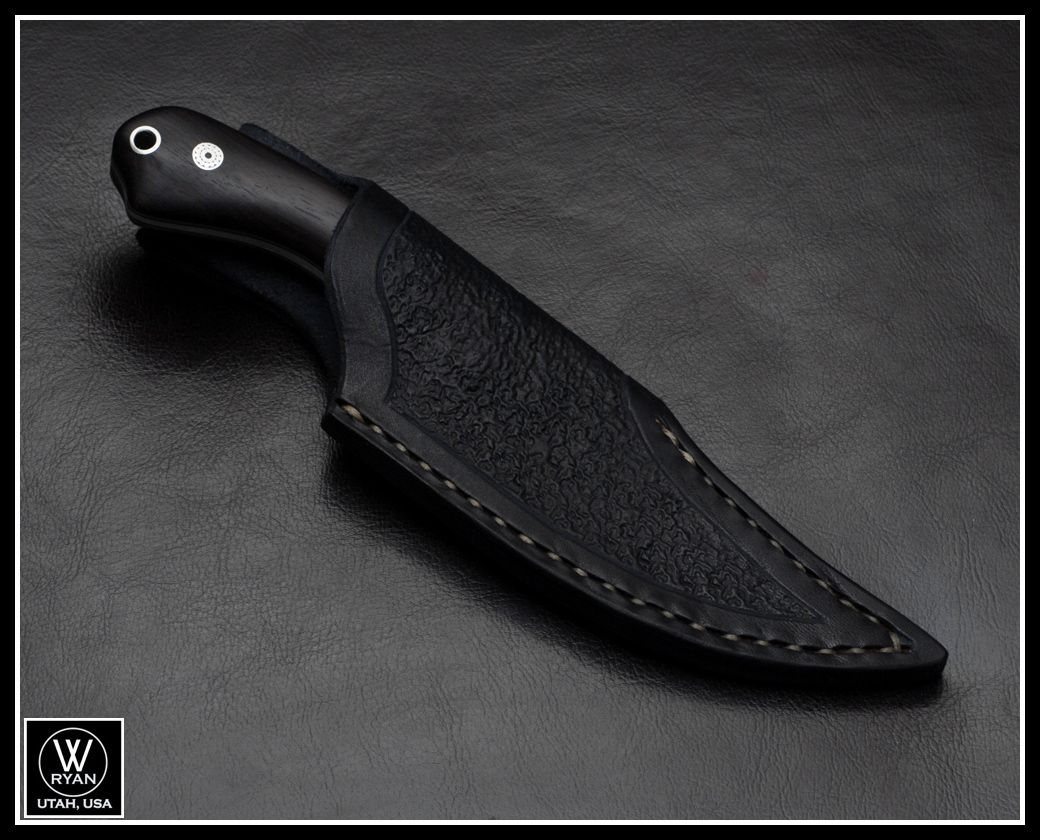
3. Any input on the sheath after using it a little? The friction fit is very nice and I don't feel that I would ever be concerned about the knife falling out. I like simple. The Denim tent is made when the knife is drawn No addition are nessessary from my point of view
Joe - "JParanee"
Pennsylvania, USA
Guys, I am up next I believe but I sit here very depressed. I have been catching a very nice buck on camera the last few weeks and just had no time to hunt him. Yesterday I got home late and since the wind was right I slipped into the woods with a climber on my back. I hadn't been in the tree an hour or so when he came slipping by me hot on a doe. He stopped at 30 yds with his head behind a bush and I saw my chance. I put the arrow right into his shoulder. Even though I seemed to get good penetration the blood was sparse. I waited 3 hrs and took up the trail only to back out and wait for light. Well after looking all day I'm heart broken and truly saddened to have not recovered this deer.
I have hunted deer my whole life and this is the second Buck I have ever lost. The first time it really messed with me and this time it is worse.
I am very excited to be involved with this pass around but it is very bitter sweet for me because unless I recover this buck I doubt I will be shooting another one this year.
I will find something to test the knife on but right now I'm very upset.
I got it guys
Just came this morning while I was in the woods hunting
We did a quick sweep and push looking for the one I hit
I had a ton of deer mostly doe and small bucks with in bow range but not my big boy so I did not loose an arrow
Are early archery season ends Monday and we have no hunting on Sundays so I only have one more day to look for him and I'm not gonna shoot any other
I just unpacked it when I got out of the woods and had to run to meet an insurance adjuster on one of my buildings for a storm claim
So a quick impression is that it's a very nice knife just really dull
This knife is on its way to Codger and it saddened me to let it go
Ryan is a great maker that I can see many great things coming from him in the future. His fit and finish is very good and beyond that in a sea of knives his pieces stand out as his which is an accomplishment many makers never achieve.
His use of modern handle materials and his etched blade finishes combine an ancient and modern look that I truly dig
I see great things coming from him and I anxiously await the day we can work on something together.
As for his knife .......simple put I love it
As stated earlier I am used to a more paring shaped knife as a skinner etc. I wish I could of put this knife thru its paces actually caping and skinning an animal but alas I failed at harvesting my target animal and no doubt will not get a chance to put something down or at least one of my kids putting something down till later in the season.
I could easily see how I could get used to the upswept blade and by choking up on the blade I am sure detail work would be a pleasure.
What I do like about the knife is as follows
Handle shape
Blade shape
Finish
Serration on the spine of blade for when you choke up on it and different hand positions
Blade takes a keen edge quickly
What I don't like
Would prefer the blade was sharpened all the way down
On a handle this size I would like all one material (personal preference)
Although the sheath is very well made on blades this size I would prefer a horizontal sheath but again that is personal preference
Ryan Ill be watching you and thanks so much for including me
I have hunted deer my whole life and this is the second Buck I have ever lost. The first time it really messed with me and this time it is worse.
I am very excited to be involved with this pass around but it is very bitter sweet for me because unless I recover this buck I doubt I will be shooting another one this year.
I will find something to test the knife on but right now I'm very upset.
I got it guys
Just came this morning while I was in the woods hunting
We did a quick sweep and push looking for the one I hit
I had a ton of deer mostly doe and small bucks with in bow range but not my big boy so I did not loose an arrow
Are early archery season ends Monday and we have no hunting on Sundays so I only have one more day to look for him and I'm not gonna shoot any other
I just unpacked it when I got out of the woods and had to run to meet an insurance adjuster on one of my buildings for a storm claim
So a quick impression is that it's a very nice knife just really dull


I know there has been a lot of pics of this knife but it is very photogenic
I had kit out today with bow in hand and snapped a few pics


I had kit out today with bow in hand and snapped a few pics
This knife is on its way to Codger and it saddened me to let it go
Ryan is a great maker that I can see many great things coming from him in the future. His fit and finish is very good and beyond that in a sea of knives his pieces stand out as his which is an accomplishment many makers never achieve.
His use of modern handle materials and his etched blade finishes combine an ancient and modern look that I truly dig
I see great things coming from him and I anxiously await the day we can work on something together.
As for his knife .......simple put I love it
As stated earlier I am used to a more paring shaped knife as a skinner etc. I wish I could of put this knife thru its paces actually caping and skinning an animal but alas I failed at harvesting my target animal and no doubt will not get a chance to put something down or at least one of my kids putting something down till later in the season.
I could easily see how I could get used to the upswept blade and by choking up on the blade I am sure detail work would be a pleasure.
What I do like about the knife is as follows
Handle shape
Blade shape
Finish
Serration on the spine of blade for when you choke up on it and different hand positions
Blade takes a keen edge quickly
What I don't like
Would prefer the blade was sharpened all the way down
On a handle this size I would like all one material (personal preference)
Although the sheath is very well made on blades this size I would prefer a horizontal sheath but again that is personal preference
Ryan Ill be watching you and thanks so much for including me
Michael - "Codger_64"
Tennessee, USA
what would it take to get you not to use the pull through sharpener? they eat knives for breakfast and are done with the leftovers by dinner. i am not trying to be rude im just a concerned knife lover and dont want to see that beauty retire early.
ReplyDeleteJustin Marquez